Friday, October 28, 2011

Chocolate Donuts with Chocolate Glaze

There's nothing better than chocolate donuts.  Nothing except homemade chocolate donuts.  Oh, and I guess homemade chocolate donuts with homemade chocolate glaze.  Wait, there is one thing that trumps them all: mini homemade chocolate donuts with homemade chocolate glaze.


I even got tagged on Facebook when I was making these for being such a loving wife.  Nobody ever said vegan=tasteless tree bark!

(Nor did they guarantee that vegan=healthy...)

Let the record show however that they did not last long... they had the life cycle of a mayfly.  About 24 hours.  Funny, because I made about 24 donuts in total.  I think...?  Even Stitch went into a sympathy-chocolate-induced coma.


The secret to this creation is the Babycakes Donut Maker.  Without it, I'd need to use a donut tin and the oven.  Who knows how long that would take!  So, because I'm obsessed with miniature foods, I could not resist buying this contraption a few months back when it was on sale.  Twenty bucks!  Can you believe it? After my beloved departed food processor, may you rest in pieces, this is up there as a potential favorite appliance.  What knocks it down is its lack of versatility.  The rice cooker steams vegetables and makes soup... bread maker takes care of the pesky dough-kneading task for other types of foods (bread, pizza, cinnamon buns...mmmm).  The mini donut maker... makes... mini... donuts.  I need to get creative and make a zillion different kinds and then I'll feel better about including it in the top 5.  Right now I just feel like a biased hedonist with a mean sweet tooth.

Behold, babycakes!

MINI CHOCOLATE DONUTS WITH CHOCOLATE GLAZE
Makes 1 servings, be honest with yourself.
Ok, makes 2.  ;-)

*Recipe adapted from the one that came with the donut maker.  And by adapted I mean veganized.*

CONTENTS
*Donuts*
1 1/4 cups AP flour
1/2 cup cocoa (I used Hershey's Special Dark)
1/2 cup cane sugar (granulated white-like)
1 TBS baking powder
1 flaxseed egg (1 TBS flaxseed meal mixed with 2 TBS water, set aside to thicken)
3/4 buttermilk (3/4 cup milk, 3/4 tsp vinegar.  Mix and set aside)
1/4 cup vegetable oil
1 tsp vanilla

*Glaze*
3/4 cup powdered sugar
2 TBS cocoa powder
2 TBS milk (or half and half, or creamer if you have it.  It's recommended in the original recipe, I just didn't have any)
1 tsp vanilla

FASCIST DIRECTIONS
1. Get excited for delicious mini chocolate donuts in just a few minutes!
2. Mix the milk and vinegar and set aside.  Also mix the flaxseed meal with water and set aside.  Most recipes will recommend 3 TBS of water per TBS of flaxseed meal but I like it really paste-y so I usually only go with two.

"Buttermilk," which is how you'd make it if you don't already have it on hand.  Us vegans must make it.


Flaxseed "egg" after thickening.

3. Mix the dry ingredients while those two wet ones are settling.  The milk should be left alone after mixing about 7-10 minutes.  So prepare that first for sure.

4. Add the wet ingredients (including the vanilla) to the dry and mix it up. 

5.  When well mixed, follow your donut maker's directions.  
They state about 2 TBS of batter in a heated donut maker per donut.  Close the lid and wait for the light to change.  I actually find that it's better to time it.  Maybe it's the flaxseed being used instead of a chicken egg, but it seems undercooked with the default time.  I go 4 minutes on the first round and then I'll flip them over and go another 3 minutes.  It hasn't burned a single one yet so it seems pretty safe.
 

 6. Meanwhile, make the glaze.  Ready for this?  Mix all of the glaze ingredients really well.  Now wait for your first batch,.
Torture, I know...

7. Remove your first batch and set aside on a wire cooling rack for a couple of minutes.  I used this "cooling time" to load the next batch into the donut maker. 

8. Dip the donuts halfway into the glaze and set back on the rack to cool. 
I highly recommend putting the rack over a plate or sheet of some sort because they will drip delicious chocolate goodness that you can later force yourself to clean with a spatula.   

9. Bake, cool, dip, cool, eat, repeat!  Emphasis on eat and repeat ;-) 
 Yum... and fun!

Wednesday, October 26, 2011

Cheezy stack


Thank you, comfort food.

For me, anything with sauteed mushrooms is probably going to be enjoyed maniacally.  I was one of those people who hated something and then under pressure had to try it and found that it was awesome and I'd been missing out.  That was my experience with mushrooms, avocado and yesterday, with ginger beer.  I was in heaven with that carbonated beverage!  I like Canada Dry's Ginger Ale, always have, and once I tried the ginger beer at college and did not like it at all.  Too intense, that was something so very off about it.  So ten years later I found myself stuck with not many options... drink water (no worries) or give the ginger beer another go.  What have I been missing out on????? I knew immediately what it was.  My unrefined ginger palate of a decade ago has come around.  These days I crave raw ginger, and that ginger beer was heavy on the natural ginger flavor.  Goes to show you.  I say that I haven't met a fruit or vegetable I haven't liked, and as a vegan I feel it's my responsibility to try a new one when it comes my way (thank you starfruit, you tropical joy, you!).  There's still one that gets me, and I keep trying it wondering if all of a sudden I'm OK with it.  Grapefruit.  Can't do it. Don't like it. Sorry citrus family, that is the third cousin-twice removed that needs to be kept in the storm cellar.

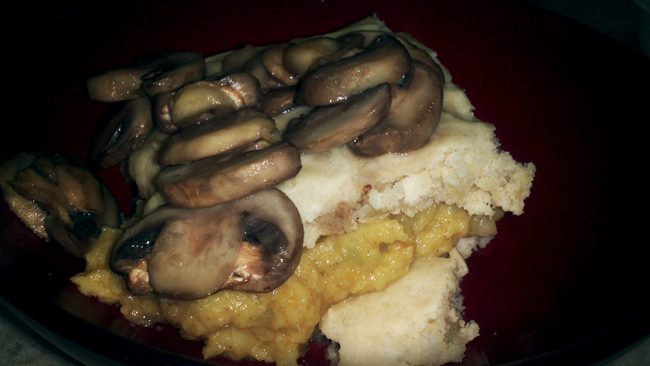
After that digression, I bring you a stack of food.  It started with the quick "bread", then I had leftover cheeze sauce, cauliflower and mushrooms.  Originally I had thought to roast the cauliflower and put it 'tween the "bread" but then I thought to steam it til softened and mix in the cheeze.  Bingo!  Top with sauteed mushrooms (another last minute switcheroo, originally envisioned in the middle of the stack, then mixed into the cheezy cauliflower mash, and lastly just tossed on top).  All in all this recipe didn't take very long. 30 minutes start to finish.

CHEEZY STACK
2-4 servings, depending on hunger level (I only had breakfast that day, so I justified eating everything.  It's really about the "bread" in this case, the veggies are super light and perfectly measured for two people).

CONTENTS
"Bread"
1 cup flour
1/4 cup oil
1 tsp salt
1 tsp baking powder
1/2 cup H2O

"Cheezy Cauliflower Mash"
2 cups raw cauliflower florets
1/4 cup prepared cheeze sauce
water to steam

Sauteed mushrooms (1 cup sliced mushrooms with a little oil and/or margarine)

FASCIST DIRECTIONS
1. Make the bread.  Heat your oven to 425F and mix all the bread ingredients.  You may need to add a little more water to get just the right consistency.  It's not like a dough you knead, more like a sticky batter.

Bake at 425F for about 20-30 minutes. I used an 8x8 baking dish.

2. Meanwhile, boil a small amount of water (1/2 cup-3/4 cup, you can add more later if you feel it's eva-poo-rating too much).  Add the cauliflower florets and cover.  "Steam" about 10-15 minutes, until soft enough to mash with a fork. 

3.  Mash it with a fork! Start sauteeing the mushrooms now too.  Keep an eye on them and stir often.
Then mix in the cheezy sauce.

4. When the "bread" is ready, remove from the oven and cool about 5 minutes. Stir those mushrooms.

5. Divide equally so that everyone gets two pieces of "bread" and place one piece at the bottom of a bowl or plate. Stir those mushrooms.

Top with some cauliflower cheeze mash.  Stir those mushrooms.

Layer another bit of bread on top.  Stir those mushrooms.  Turn off the heat for the mushrooms too; they should be done by now or close to it.

6. Top with mushrooms when done! 
Total Yum.  I think the next time I'll make it with a cornbread style bread.  I love me some cornbread.  Crumbly and delicious, so very very delicious...

Sunday, October 16, 2011

Banana-Cashew Cookie Ice Cream

Some of life's simple pleasures are being able to create amazing things and then being able to consume them. That happens with most of my inventions... especially those involving food ;-)

As much as I LOOOOOOOOOOVE anything by So Delicious, I also like being able to come up with my own recipes.  I have made banana-based ice creams before ("cream"), and they always rock.  Be careful how long you freeze the fruit though, it could kill your processor (sniff... RIP).  An hour is good, so I tend to chuck the banana in the freezer (chop it up and without the peel!) when I'm done cooking dinner so that we have some time to digest between the main meal and a decadent dessert.  

There were a couple of days that I created the flavors for ice cream without having bananas... so this recipe came together in two stages... First the cashew-cookie bit (which rocked but was really dense, so it needed the banana to fill it out), then the whole thing.  I also made chocolate, which I can't wait to make into a full ice cream!  

BANANA-CASHEW COOKIE ICECREAM
2 servings, or just one... let's be honest...

1/2 cup roasted cashews
1 TBS ground flaxseed
1/4 cup powdered sugar
2 TBS milk
1 tsp vanilla
1-2 TBS flour (I think oat or almond flour would be nice)
1/4 cup chocolate chips
2 large froze bananas (frozen about an hour)

FASCIST DIRECTIONS
1. Blend those cashews!
Action shot below!
Keep blending until you have a coarse meal.  The natural oils should release and give it a great texture.

2. Add the flaxseed meal and give it a stir.

3. It started to glob up already, you can see it in the picture below.  Before it was too late, I added the sugar, flour vanilla and milk.  Use your best judgement, add more flour (a little at a time) if it seems too runny.

4. Add the chocolate chips and give it a quick whir to mix it all in.

5. Remove the goop and set aside.  Don't worry about cleaning the processor.

6. Chop/blend/grind the bananas until creamy.  Add the cashew cookie goop back in and mix til well blended.

Tis delicious!  Serve and marvel at your creation.  I marveled at both the dessert and the table ;-)
YUM!!!!

Saturday, October 15, 2011

Sweet Tart Pasta

Oh my... I was impressed with this one.  I have all these limes to use up and pasta is quick.  Can you tell we're scouring the pantry so we don't have to shop?  I, can you tell that I am scouring the pantry... as the resident chef and all-knower of pantry contents.  

So I think this meal turned out to be fantastic.  Lime with some agave gives that sweet 'n sour taste; the toasted almonds add a lovely crunch and the dash of cayenne gives it the kick to make everything work.  I do recommend a whole-wheat pasta rather than a white pasta.  It is probably good with spinach pasta mixed in too!

SWEET TART PASTA
2 servings

CONTENTS
4-6oz pasta depending on how hungry you are...
1 TBS agave nectar, divided
2 tsp olive oil, divided
roughly 1/3 cup fresh basil leaves
zest and juice from 2 limes
2 TBS slivered almonds, toasted
a light sprinkle of cayenne and salt


FASCIST DIRECTIONS
1. Set the oven to 350F to toast the almonds.  Walnuts would probably be good too come to think of it...  Lay the almonds out in a single layer and toast about 10 minutes.  You'll smell their awesomeness telling you they are ready.
2. Meanwhile, boil water for the pasta.
3. Get your limes and basil out.  Take a nice picture of them.
4. Rub the limes to loosen the juice.  It's a great way to get the most out of your citrus!
5. Time to chiffonade your basil... It's a fancy culinary term for slice into thin strips.  The technique is to roll up the leaves and then slice them.  It works!
Below I picture the series of my trying to photograph myself chiffonading my basil...

And viola!  You have ribbons of basil.
By now your almonds should be toasted and looking like this:
So remove from the oven and let them cool (turn off your oven too, unless you're making garlic bread...mmmm)

6. Zest the lime into the basil pile and mix.
7. Your pasta should be ready.  Serve into bowls.
Mix in the basil and zest, then squeeze a lime into each depending on your lime tolerance.
Drizzle with olive oil and a sprinkle of salt.
Mix it up and top with the almonds and a dash of cayenne. Totally awesome!
Mmm... Yummy....